Notability Object Selection: Adventures in Vector Graphics
A deep dive into the capabilities of Notability.
By Holmes Futrell, Notability engineer
One of my favorite aspects of Notability’s design is that every bit of content is editable and interactive after it’s created. For example, after you draw a diagram you can select, scale, and move it within your Notability document without it becoming pixelated. You can play back recorded audio and tap your handwritten notes to navigate the recording to the point in time at which you jotted those notes down. You can erase objects to split them apart using the Partial Eraser feature and then select those newly subdivided objects individually. These are powerful features — some of which are totally unique to Notability as a note taker.
In this post, I am going to take you on a deep dive into how we solve a specific problem needed to implement these sorts of features: how does Notability determine which object a user has tapped for selection?
Graphics Paths
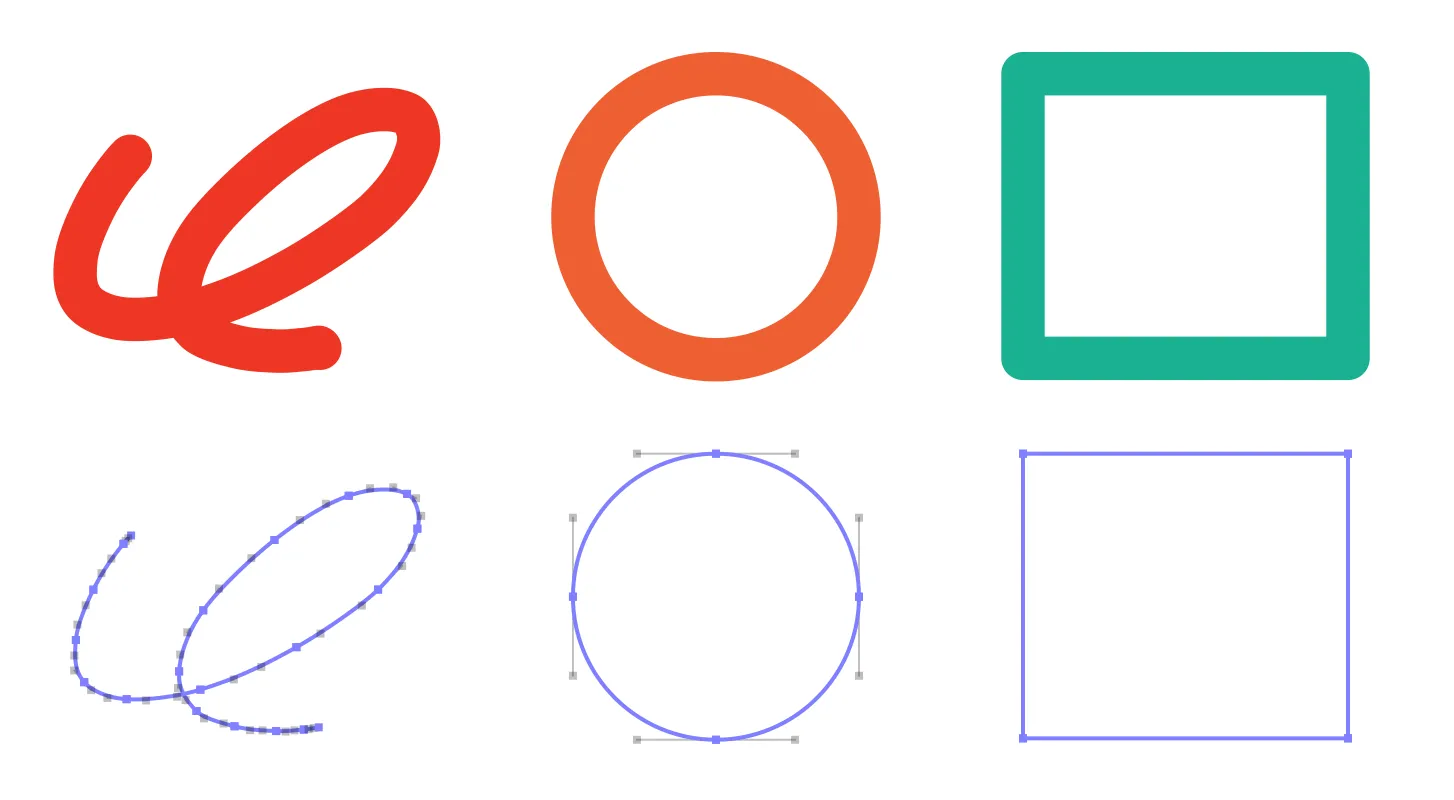
To keep Notability documents editable and interactive long-after their contents have been created, we need to store their content in such a way that the graphics shown on screen can always be recreated. Instead of using a pixel representation many objects in Notability documents use a vector representation. One of the most fundamental building blocks for that representation is the notion of a graphics path, also known as a Bézier path.
Apple provides several APIs for graphics paths.CGPath in Core Graphics has been around the longest and is available on all Apple platforms. This API lets you construct paths from basic shapes such as rectangles and ellipses, or by dashing, stroking, and transforming other paths. It has a mutable cousin named CGMutablePath that lets you construct almost any shape you desire by appending series of lines, arcs, and curves together end-to-end through commands for adding lines, arcs, and curves.
Apple’s newer graphics APIs can come in handy as well: iOS added UIBezierPath which works largely the same except that instances of this class also take on some responsibilities for style and drawing that the programmer would otherwise do through the graphics context. And most recently SwiftUI added its own struct, simply called Path, which gives graphics path concepts a Swift-y, declarative spin through an API that is ultimately similar to the older ones.
The good news is that no matter which API you choose, they are all largely interoperable — in each case, instances can be constructed directly from CGPath objects using init(cgPath:)and converted back to CGPath objects through their cgPath property. The library I’ve authored, BézierKit, also has this same interoperability. This is possible because each API models graphics paths the same way, as series of Bézier curves.
You mean it’s all Bézier curves?

It turns out that Apple’s graphics paths are all made up of linear, quadratic, and cubic Bézier curves. When you create a rectangle using CGPath.init(rect:) it’s actually creating four linear Bézier curves (line segments) — one for each side. When you create an ellipse using CGPath.init(ellipseIn:) it’s actually creating four cubic Bézier curves that form a good enough approximation that you cannot perceive the error. When you add arcs to a path those too are converted to one or more cubic Bézier curves.
Since Apple’s graphics path APIs all use Bézier curves as their lowest level primitives it’s perhaps no surprise that objects in Notability documents use Bézier curves as their primitives as well. And since many objects in Notability reduce down to Bézier curves, engineering tasks sometimes reduce down to working with these curves too.
Notability object selection
In Notability, users can tap shapes or media such as photos they’ve inserted to select them. During playback of recording they can tap a piece of content to navigate the recording to the point in time that content was created. These sorts of handy features require translating user’s input to interpret which object they intend to interact with.
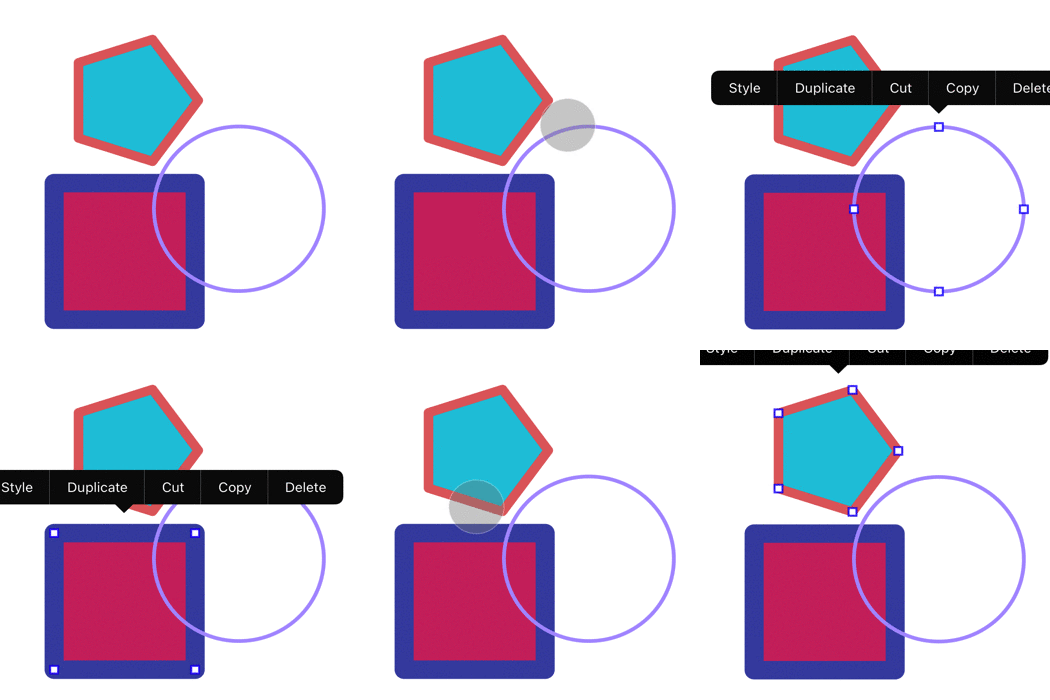
If object selection were just a matter of determining the topmost object in the document for which the user’s touch coordinate fell inside that graphics path, then determining which object to select would be easy: we could iterate through each path beginning with the topmost object and return the first object whose path contained the user’s touch coordinate by using CGPath.contains(_:using:,transform:)
But when dealing with touch data, the input coordinates are not precise. Fingers are clumsy to begin with, documents can contain fine detail, and the touch coordinate iOS supplies represents only a rough center of the touch’s impression on the screen. So Notability must interpret which object a user intends to hit, even if the touch coordinate is close but not directly contained in an object’s path.
We first tried clever workarounds for this, such as testing multiple points in the neighborhood of the touch coordinate, or testing the coordinate against an expanded, stroked copy of the path created with CGPath.copyStrokingWithWidth. It’s always good to try simple solutions first.
But these workarounds surface a related problem: there may be multiple objects close-by and in that case we’d like to respect the user’s intent as best we can by selecting the object closest to their touch. Solving this problem means actually finding the distance between a user’s touch and the graphics paths of objects nearby. Since graphics paths are made of Bézier curves, this reduces to the question: how do we find the distance between a point and a Bézier curve?
Minimum distance from point to Bézier curve
To find the distance between a point and a graphics path, we need to delve into the mathematics of the Bézier curves that form the basic elements of those paths.
Bézier curves are parametric curves that can be defined by a polynomial function B(t) over the interval 0≤t≤1 (the unit interval). For each value t the function B(t) yields an (x, y) coordinate of a point along the curve, with t=0 corresponding to the start of the curve, and t=1 corresponding to its end.
The distance equation
The distance equation represents the distance between a point p (in our case, a user’s touch input coordinate) and a Bézier curve B(t) (part of a graphics path). The equation is written as the length of the vector difference between these quantities.
Applying some Calculus, the distance between the point and curve is minimized either at a curve endpoint or at a critical point of the distance equation (to make the math a little simpler, we actually consider the critical points of the distance equation squared, which are the same). Finding the critical points of the distance equation can be achieved by solving for where its derivative is equal to zero, as shown below:
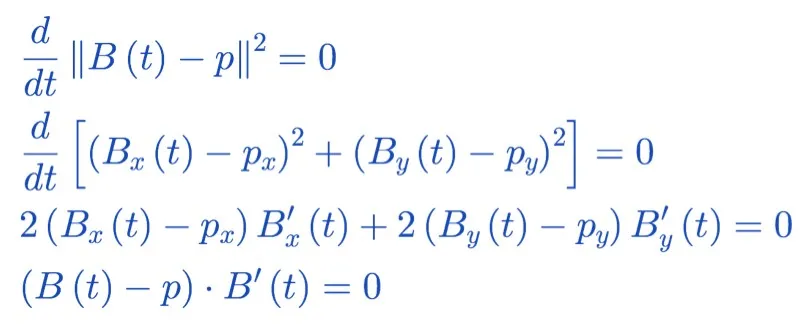
The final line of Equation 1 frames the problem of finding the critical points of the distance equation as solving for where a vector dot product is equal to zero. The left side of the dot product represents a line cast from the curve to the point, and the right side represents the curve’s derivative. We arrived at this final line by dividing by 2 and then applying the definition of the vector dot product.
The dot product of the final line has an interesting geometric interpretation. When neither side of the dot product is zero by itself, the critical point correspond to a location on the curve where its tangent line and a line cast to the point are perpendicular.

Finding the critical points of the distance equation
For linear and quadratic curves we can actually solve for the critical points directly.
For linear curves B(t) is a linear function, and B’(t) is a constant, which means the dot product of Equation 1 yields a linear equation, which can be algebraically solved. When all the terms are expanded we get the classic formula for vector projection of a point onto a line.
For quadratic curves the math is more involved, but workable. The lefthand expression of the dot product is a quadratic polynomial and the righthand side of the expression is a linear polynomial. Multiplied out, the solutions fall at the roots of a cubic polynomial. Hundreds of years ago mathematicians figured out how to write formulas for these roots as well as for the roots of quartic (4th degree) polynomials. These formulas are long enough that you’d be glad you have to enter them into a computer only once.
It’s cubic curves where things get real messy — the lefthand expression of the dot product is a cubic polynomial, and the right-hand expression of the dot product is a quadratic polynomial. Multiplied out the solutions are the roots of a quintic (5th degree) polynomial. Around the turn of the 19th century, mathematicians proved that writing an algebraic formula for the roots of a 5th-degree polynomial is impossible in the general case. We need an algorithm to find these roots instead.
Minimizing the distance equation using Bézier Clipping
There are many ways to go about polynomial root finding (and I’d never finish this article if I hoped to describe them all). Instead, I’m going to describe one elegant and efficient method that applies here called Bezier Clipping².
The geometric insight that makes Bézier Clipping so elegant is called “The Convex Hull property”¹ of Bézier Curves. The property states that a Bézier curve falls entirely inside the convex hull of its control points. You can visualize the convex hull as the polygon you’d get by stretching a rubber-band around these points.
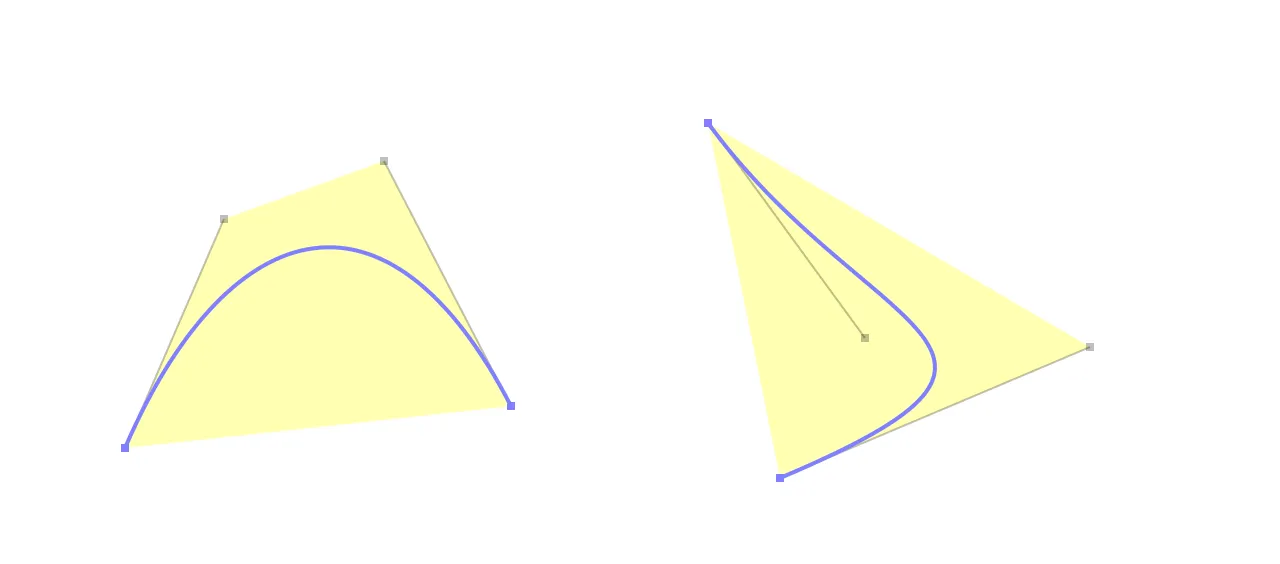
The convex hull property tells us that since a Bézier curve is contained entirely within its convex hull, any roots must be located in the region where the convex hull overlaps the x-axis. The Bézier Clipping algorithm works by determining this range and iterates by subdividing (clipping) the curve over it. In general this approach converges quickly, similar to the better-known Newton’s Method.
How does this relate to solving Equation 1? Bézier Clipping is an algorithm on Bézier Curves, but we need to find the zeroes of a polynomial. It turns out that if we take care in our multiplication of the dot product of Equation 1, we can keep the equation in the form of a Bezier curve (referred to as an “Explicit Bézier Curve”¹). For example, if the left-hand side of the product is a quadratic Bézier curve then its derivative is a linear Bézier curve and the final dot product can be represented as a cubic Bézier curve. The Bézier Clipping algorithm can then be applied to find the roots of this curve (or any Bézier curve). An animated example of this in action is shown below.
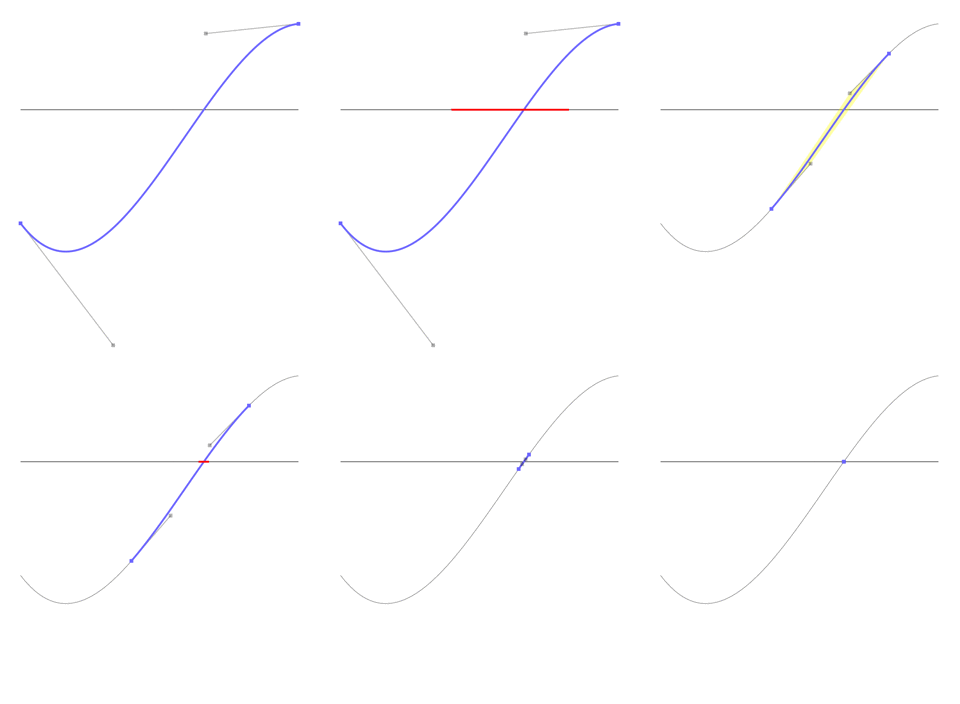
During each iteration the clipped curve is shown in blue and then its convex hull is highlighted in yellow. The range where the clipped curve’s convex hull intersects the x-Axis is shown in red — the input to the next iteration is the curve clipped to that range. The animation only shows 3 iterations because after proceeding that far the curve has been clipped down to a tiny curve that looks like a point, but if it continued for two more iterations we could obtain an estimate of the root with error bounds yielding 12 digits accuracy.
Conclusion
Return from Math Land
Let’s zoom back out: we started by discussing how objects in Notability use a vector representation and how that enables a whole host of powerful features. Next, we talked about how the representation as Bézier curves means that engineering challenges sometimes reduce down to finding characteristics of the curves. In particular, we showed how the challenge of selecting the object nearest to the user’s touch reduces down to finding the minimum distance between a point and a Bézier curve. We discussed how to solve this problem by minimizing the distance equation, whose critical points can be located using the Bézier Clipping algorithm. Talk about reductionism!
If that seems like a lot of math to solve a specific problem, it definitely would be. However, these same techniques are used elsewhere in the app. For example, the Bézier Clipping algorithm was originally designed to intersect curves with each other, and it can be applied to help with the eraser tool by checking if the eraser tool’s graphics path intersects other objects.
This blog entry glosses over a lot of programming implementation details and mathematics. If you want to read more about the math behind Bézier curves I’d recommend checking the article’s references below. For an interactive presentation you can check out A Primer on Bézier Curves which is filled with JavaScript demonstrations.
Check out our sample code for a full implementation of the algorithms discussed in this blog entry. The code sample has an interactive Mac and iOS demonstration for determining the closest point to a point on a Bézier curve, and has a working implementation of the Bézier Clipping algorithm too.
A quick pitch, since you made it this far
Are you an aspiring vector graphics whiz? Ginger Labs has positions available where you can refine your skills! We’re seeking new team members to help with Notability from user interface development to back-end. And even if the math in this article made your eyes glaze over a bit, we may have a job for you. Visit our jobs page:
[1]: T.W. Sederberg. “Computer Aided Geometric Design” https://scholarsarchive.byu.edu/facpub/1/
[2]: T.W. Sederberg and T. Nishita. “Curve intersection using Bézier clipping” http://nishitalab.org/user/nis/cdrom/cad/CAGD90Curve.pdf

